Build the poster around one clear storyline
A mung bean sprouting project is one of the easiest and most popular plant observation topics for students. When making the poster, the goal is not to write a long science article. The goal is to show clearly how a small seed changes over time. A good structure is preparation, daily observation, discoveries, and reflection. This makes the poster easy to read and easy to organize.
You can choose a title such as “My Mung Bean Sprouting Observation,” “How Mung Beans Grow,” or “Mung Bean Growth Diary.” These feel natural and match what students actually do in class projects.
Best sections to include on the poster
1. What I prepared
Write a short section about the materials you used, such as mung beans, water, tissue paper, and a small plate or clear cup. Keep this part simple and practical.
- Choose full and healthy mung beans
- Soak them in water first
- Place them on wet tissue paper
- Keep them moist and in a ventilated place
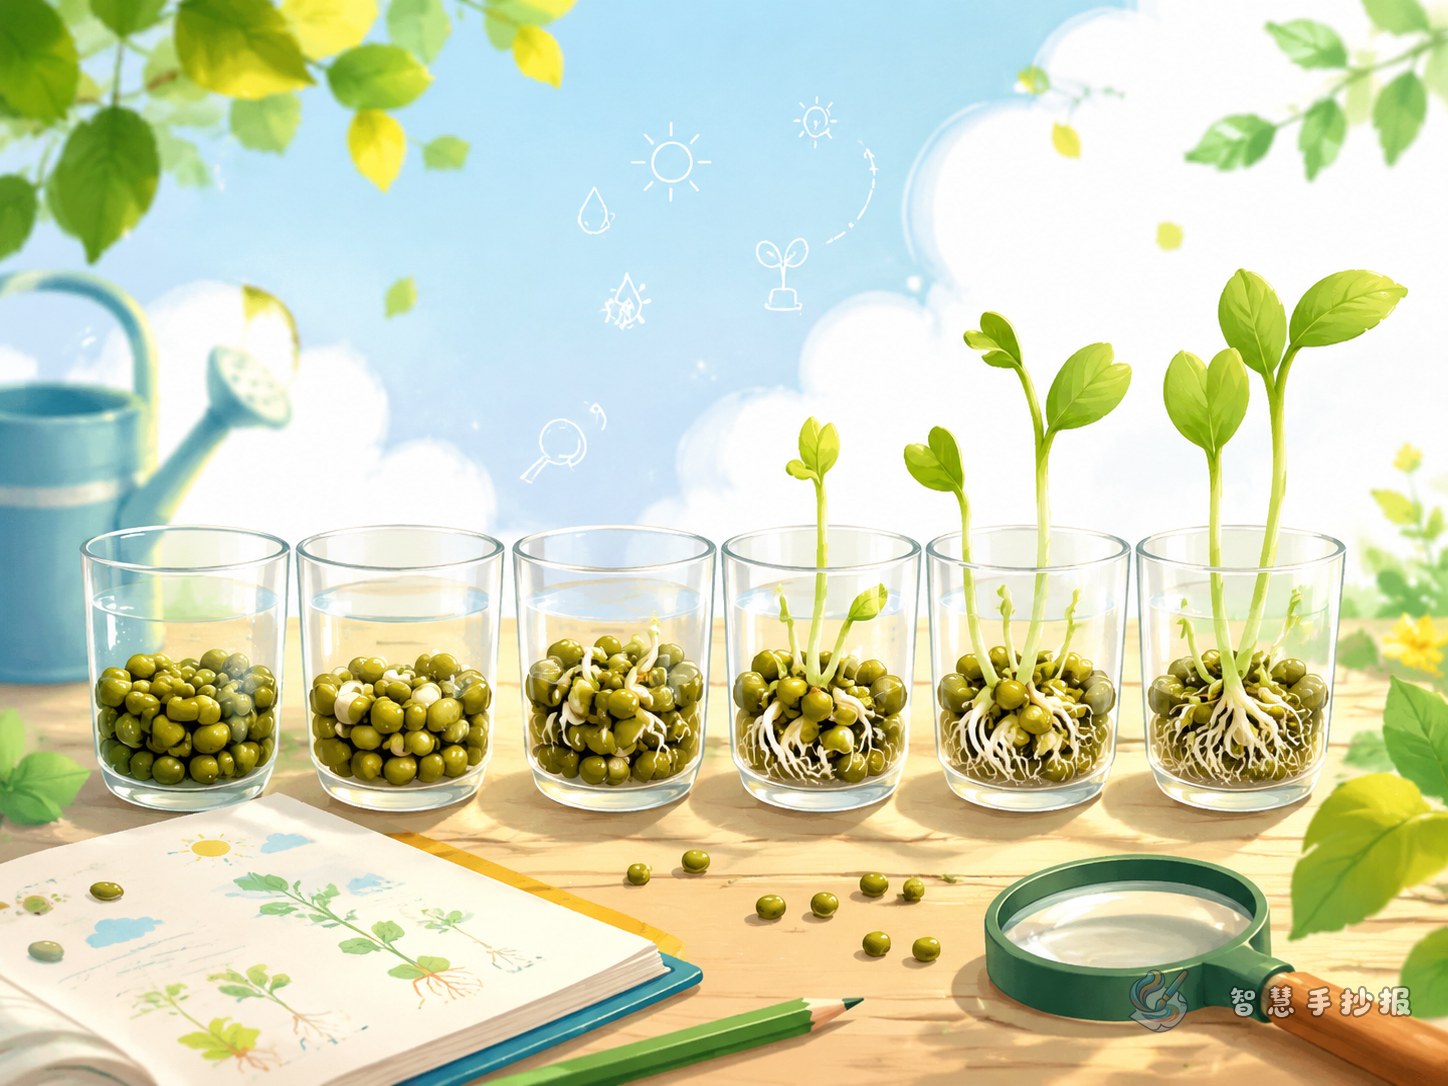
2. Growth timeline
A timeline is one of the best ways to present this topic. Record the most obvious changes day by day.
- Day 1: The beans absorb water and become larger and softer
- Day 2: Some beans crack open and show a tiny white sprout
- Day 3: The root grows longer
- Day 4 and later: The sprout becomes taller and small leaves may appear
3. What I discovered
This section can explain simple conclusions from your observation, such as seeds needing water, proper moisture, and a suitable environment to grow well.
4. My reflection
You can add a personal sentence like “I learned that plants need care and patience,” or “Watching a seed grow helped me notice small changes more carefully.”
Ready-to-use writing materials
If you are not sure what to write, you can use short sentences like these.
- After absorbing water, the seed coat becomes softer and prepares for sprouting.
- The first part to grow is usually the root, not the leaf.
- Plants need water, air, and a suitable environment for growth.
- Good observation means recording time and change in order.
- A small seed can show amazing生命力 through steady growth.
You can also write a short observation paragraph: I soaked the mung beans in water, and after some time they became round and full. On the second day, some beans cracked open and tiny white sprouts appeared. Over the next few days, the sprouts grew longer, and I felt how amazing plant growth can be.
How to arrange the page neatly
This topic looks great in a timeline-style layout. Put the main title at the top or center, then divide the page into sections.
- Top area: title and a short theme sentence
- Left side: planting steps and tools
- Right side: daily observation notes
- Bottom area: discoveries, reflections, and a small fact corner
For decoration, use simple elements like bean sprouts, leaves, water drops, or flowerpots. Green, light yellow, and light blue are good color choices because they match the plant theme and feel fresh.
Small details that can improve the poster
Some posters only say that the mung beans sprouted, but do not describe the process clearly. To make your work better, include details like these:
- The order of growth: cracking, rooting, sprouting, then leafing
- Color changes such as green seed coat and white sprout
- Shape changes such as swelling, softening, and lengthening
- Your daily care, such as adding water or keeping the tissue damp
These details make the poster look like a real observation project instead of a simple collection of copied sentences.
A simple ending that works well
You do not need a long ending. One or two clear lines are enough. For example: Through this mung bean observation, I learned that plant growth needs suitable conditions and careful attention. A tiny seed helped me see the power of life and growth.
If you already have your content and want to keep polishing the layout and style, you can continue in the Zhihui Shouchaobao WeChat mini program.